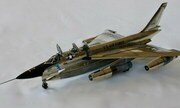
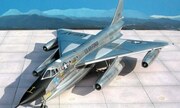
Ron GarciaThis kit has been in my stash since the 80's. It is one of my favorite planes, so it was high time that I built it. I read a review that said it was a big headache, but I didn't think it was that bad. It actually fit together well, I thought. Here are some thoughts that might help:
I thought it would need a ton of weight to prevent it from being a tail sitter. Not true. After you cement the cockpit into the lower fuselage, fill the open space in front of it level with the lower fuselage with BB's and that will be enough weight.
I bought Scale Aircraft Conversions landing gear set prior to starting this build. I thought there would be too much weight on the landing gear. Don't worry about it. The plastic landing gear supplied in the kit is plenty strong and detailed enough.
There are also replacement parts for things like the pitot probe and exhausts if you want to splurge. I thought the kit pitot probe looked fine. I also used the kit's exhausts because once done, you can only really see the two outside ones clearly and only the sides of the two interior ones. As far as the accuracy of the kit supplied ones, I don't know, but again, they looked fine to me.
The hardest part for me was the seams between the upper and lower fuselage halves. They both seemed to mate well, with the left side slightly off, but after sanding them smooth, the primer coat kept showing the joins. I rinse and repeated a few times (trying to save as much raised panel lines as I could) but the joins kept showing up. I finally grabbed some heavy duty sanding paper and sanded hard enough so that I could feel the heat of the friction on my fingertips. That did the trick. Surprisingly, the two sides of the joins were not flat after that, but if they were, there is plenty of plastic to sand a bit of a curve back in (at the expense of the panel lines).
I thought there would be a lot of other areas that would require a lot of filling and sanding but I was wrong (with one exception). Even the engine nacelles only required a bit of putty here and there.
The one exception was the fuel tank/bomb pod. I didn't dry fit it beforehand (dumb) and when I attached it near the the end of the build - after painting the entire kit - it just didn't mate well with the fuselage. Perfect Plastic Putty to the rescue but it still required unnecessary touch ups when I was almost completely done.
The right side of the windscreen has an extra window that I never saw on any pictures on the internet. I sanded that one smooth.
In addition to various other metallic shades, it took me two full bottles of Alclad II Airframe Aluminum to paint the model.
And that's it. It was certainly easier to build than Monogram's B-17, B-24, and B-29. Along those lines, it is a big kit. My wife even asked if it was the same scale (1/48) as the the other planes I build. I built Heller's venerable Mirage IV many years back. I thought they might be comparable in size. Nope. The B-58 dwarfs that bomber. If your B-58 has been sitting in your stash gathering dust like mine was, break it out and build it. It's really not a tough build. I think the finished kit looks great and I highly recommend it.
2 4 September 2021, 22:22