
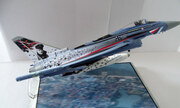
Eurofighter Typhoon "Bronze Tiger"
Revell | No. 03949 | 1:48

Hechos
- Marca:
- Revell
- Título:
- Eurofighter Typhoon "Bronze Tiger"
- Número:
- 03949 (También listado como 80-3949)
- Escala:
- 1:48
- Tipo:
- Kit completo
- Publicado:
- 2016 Nuevas calcas
- Código de barras:
- 4009803039497 (EAN)
- Embalaje:
- Caja plegable (apertura lateral)
- Tema:
- Eurofighter Typhoon » Reactores (Aeronave)
- Listed on:
Marcas
Eurofighter Typhoon
 Bundeswehr Luftwaffe (German Air Force 1956-now)
- TaktLwG 74 30+09
Mayo 2016 NATO Tiger Meet - BA Zaragoza
RAL2013
Contenido de la caja
Bebedero de plástico, Hoja de calcas (al agua)
Línea temporal del producto
Revell
Hasegawa
2006
2010
2016
2020
2022
Instrucciones
Descargar 10414Kb (.pdf)
Mercado
No partner shops available
Revisiones de caja
Reseñas externas
Anuncio

Revisión en caja
kitreviewsonline.de

Revisión en caja
IPMS Deutschland

Revisión en caja
Modellversium

Reseña
Revell Forum
Todas las reseñas » (7 en total)
Revistas
")
")
")
Todas las revistas » (3 en total)
Proyectos


All projects » (11 en total)
Galería

Todos los artículos » (33 en total)
Material de referencia
")
")
Todos los libros » (18 en total) Todos los walkarounds » (22 en total)