

[Revell] Ford GT LM 2017 - WIP
 1October 17, 2024Washed.
 2October 17, 2024Removed convex parts.
 3October 17, 2024Removed convex parts.
It was cut really cleanly. 😉 4October 17, 2024I had to make it again because I cut off 1/3 of it while trimming it. The plate was made by cutting the plastic rod, and the tiny thin part that was originally attached was made by extending the runner.
 5October 17, 2024Like this...
 6October 17, 2024Since the wiper was molded together with the body, I used nippers to cut it out.
 7October 17, 2024After trimming it well, inserted the metal rod.
 8October 17, 2024The plastic was too thick so I thinned out the fender area.
 9October 17, 2024I removed the small rivets and drilled holes to mark their positions.
 10October 17, 2024The side parts that are to be attached to the body do not fit perfectly.
And when I looked at the real car clip, that part wasn't even split. 11October 17, 2024It was firmly attached with various adhesives.
 12October 17, 2024And then I split it along the panel lines.
 13October 17, 2024Since there was nothing to hold onto where the back cover touches the door, I made a small projection and attached it.
 14October 17, 2024Since I plan to replace the air intakes on both sides with mesh, I measured the size and shape by attaching masking tape before cutting them out.
 15October 17, 2024Then I removed it.
And, I also removed the fuel filler and the part with the unknown device on the front fender. Since the plastic is quite thick, I also scraped the inside of this part to make it thinner.
 16October 17, 2024I applied the putty where needed.
I covered the area where the wiper had been removed by attaching masking tape to the opposite side and then applying putty. 17October 18, 2024Polished.
 18October 18, 2024I checked to see if the removed wiper would fit properly.
 19October 18, 2024The part that was separated earlier, the passenger side is fine, but the driver side has too much space, so it seems like it needs to be modified.
 20October 18, 2024Adhsived an pla-plate
 21October 18, 2024I cut and sanded to get it just right.
 22October 18, 2024I did the same thing with the space on the top.
 23October 18, 2024The front grille was removed because it was designed to be applied with a decal and not a molded mesh. When I looked at actual vehicle images, I found that some vehicles have mesh and some do not, so I am debating whether I should use nylon mesh or just leave it as is.
 24October 18, 2024When I tried to assemble the upper and lower plates, the marked areas interfered with each other and did not fit together perfectly, so I had to cut a lot of them off.
 25October 18, 2024There should be a groove for a tow hook where indicated, but it is missing. (There is a decal included though)
 26October 18, 2024The canards are molded into the body and get in the way when polishing, so I measured their size and shape with masking tape and then removed them.
 27October 19, 2024I cut a thin piece of pla-plate and made it into its original shape.
 28October 19, 2024This is how we plan to fit it into the groove we scraped out earlier.
 29October 20, 2024I drilled the rivet holes.
 30October 20, 2024The thick vertical wings were sanded down to make them thinner.
 31October 20, 2024There are a lot of design flaws with this kit, the biggest of which is the extremely thick rear diffuser.
 32October 20, 2024I cut them all out.
 33October 20, 2024Before sanding, I marked the original location with a iron pencil.
 34October 20, 2024Sanded.
 35October 20, 2024The marked part seemed thick, so I looked for a video of the actual car and found that it was detailed completely rubbish, so I removed it for scratch build.
 36October 20, 2024I filled the pin marks with putty.
This is because sanding later can cause the part you made to chip or distort, so it's better to do it beforehand. 37October 20, 2024Now start working.
I started by slicing the thin plas-plate into narrow pieces and gluing them together. 38October 20, 2024First, I've attached everything so that it's right angles, now I need to round the corners.
 39October 20, 2024After covering the putty, I sanded the surface to clean it up and shape it.
 40October 21, 2024Next, It's time to make the auxiliary diffusers on both sides.
sizing them so that they don't interfere with the tires. 41October 21, 2024I attached it while slightly bending it so that it was curved from the middle.
 42October 21, 2024I cut the pla-plate into the appropriate shapes, glued them to the markings, and sanded them to remove any unevenness.
 43October 21, 2024I then cut another piece of the plate, attached it as shown, and trimmed the shape to finish it off.
 44October 21, 2024Finally, it is time to work on the main diffuser. First, I cut the pla-plate into 4 long pieces and 4 short pieces(width is same), and roughly drew the shape.
 45October 21, 2024Because the rear plate is not flat, but slightly curved, it will float at the ends as shown.
 46October 21, 2024There is no easy way to do this job other than to keep sanding and trying to fit it in.
 47October 21, 2024(Gasp of breath) It took a long time, but I finally finished pasting all eight.
 48October 21, 2024Length and parallel check.
 49October 21, 2024Interval and vertical angle check.
 50October 21, 2024I refined it by sanding the end length and the edge-line of height.
 51October 21, 2024I like it. 😉
 52October 22, 2024There are shrinkage marks in places that are not good for sanding work.
 53October 22, 2024Sanded.
 54October 22, 2024I just finished sanding the entire body (I forgot to take pictures of the main body)
 55October 22, 2024I sprayed some gray surfacer on it to check the surface condition.
 56October 22, 2024Sanding...
 57October 22, 2024Sanding...
 58October 22, 2024Sanding...
 59October 22, 2024Sanding...
 60October 22, 2024Sanding done.
 61October 22, 2024I painted black surfacer to the lower body, inside of the body shell, side mirrors, and the bottom side of the wings.
 62October 22, 2024White surfacer.
 63October 22, 2024The white stripe in the middle is included as a decal, but I thought it would be easier to paint, so I painted only the striped area and the white area on the side with glossy white.
 64October 23, 2024I masked the parts that should be left white.
 65October 23, 2024On top of that, I covered the area to be painted blue with low-adhesive masking tape and painted it red (Italian red).
 66October 23, 2024Masked again for blue painting.
 67October 23, 2024Then , painted blue.
The instructions say to mix ultramarine and blue, but I thought it would be too dark, so I looked up several videos and mixed the colors to get a similar color. 68October 23, 2024Now it's time to apply the decal.
 69October 24, 2024I didn't think there would be much decals, but there were more than I thought.
 70October 24, 20241st clear coat. (UV cut clear)
 71October 24, 2024The windshield is pre-painted, but it's printed matte on the outside, so I'm going to erase that and repaint to inside.
So... before erasing, attached some masking film on the inside. 72October 24, 2024And I masked it by cutting it according to the shape printed on the outside.
 73October 24, 2024Now I have to erase the printed part with a compound....
I don't know what kind of paint it is, but it doesn't erase well. It's the coarsest compound I have, and it seems like it will take all day to erase it all. 74October 24, 2024I ended up changing my plans and erasing all with sandpaper.
After all, a model starts with sanding and ends with sanding... 🙂 75October 24, 2024I restored the surface condition. I didn't use any compound, and just sanded it with a finer and finer sandpaper(final: Glossy Sandpaper).
 76October 24, 2024Now I'm trying to fix the rest of the parts, but they're already broken.
I wish the Revell would just drop away the side open box. 77October 24, 2024Anyway, all the parts were trimmed and sorted by paint color.
 78October 25, 2024Painted some parts and overcoated body.
 79October 25, 2024But, because the paint on the body has large steps, I concentrated on the steps rather than the entire body and painted it thickly to the point where I thought, "Is it okay to paint it this thick?"
 80October 25, 2024The exhaust hole was blocked, so I tried to unclog it, but it looked awkward. So I removed the entire thing.
 81October 25, 2024Two diameters of steel pipe were cut diagonally and then trimmed.
 82October 25, 2024Then, after fixing the two together well, I plan to install them as shown in the picture on the right.
 83October 26, 2024I smoothed the surface of the headlamp cover.
 84October 26, 2024I started painting in earnest. This time, I also did an clear overcoating on the entire bodyshell.
 85October 26, 2024I finished painting the parts that I couldn't finish painting earlier.
 86October 26, 2024Painted with paint brush.
 87November 5, 2024I was concerned about the step on the white stripes and the two overlapping decals above them, so I lightly sanded them down, and as expected, the step was very severe.
 88November 5, 2024So before I did any additional coating, I sanded all and removed any steps.
 89November 5, 2024B, I got a little too greedy and scratched the paint in a few places while sanding.
 90November 5, 2024This area is prone to scratching paint.
 91November 5, 2024Since I will be repainting using a No. 2 brush, I only did partial masking like this.
 92November 5, 2024Masked.
 93November 5, 2024It looks fine in the photo, but since I accidentally used different paints to mix the colors, you can feel a subtle difference when you see it in person.
 94November 5, 2024This place doesn't really stand out, but...
 95November 5, 2024I have 3 cobalt blues, but I accidentally used the wrong cobalt blue instead of the one I originally mixed.
 96November 5, 2024Paint also spattered out beyond the mask like this. Fortunately, this can be easily erased with a compound.
 97November 5, 2024Masked again for paint tocorrectly color
 98November 5, 2024Same...
 99November 5, 2024It's finally been painted in the right colors.
 100November 5, 2024And then I coated Clear.
 101November 5, 2024Prepare 2 sheets of pla-plate cut into circles and 2 sheets cut in half. The metal parts in the container are products sold for Gunpla.
 102November 5, 2024It seems like it can be used like this.
The fuel inlet at the back is a product sold for Gunpla use, but it looks a little different from the actual fuel inlet, but I just ignore that 😉 103November 5, 2024Youtube Video
I painted the board inside with Musou Black. (I was just bored..)
This paint is a similar paint to Vantablack and is characterized by blocking 99.4% of light reflection (Vantablack blocks 99.96%, MIT blacks 99.995%).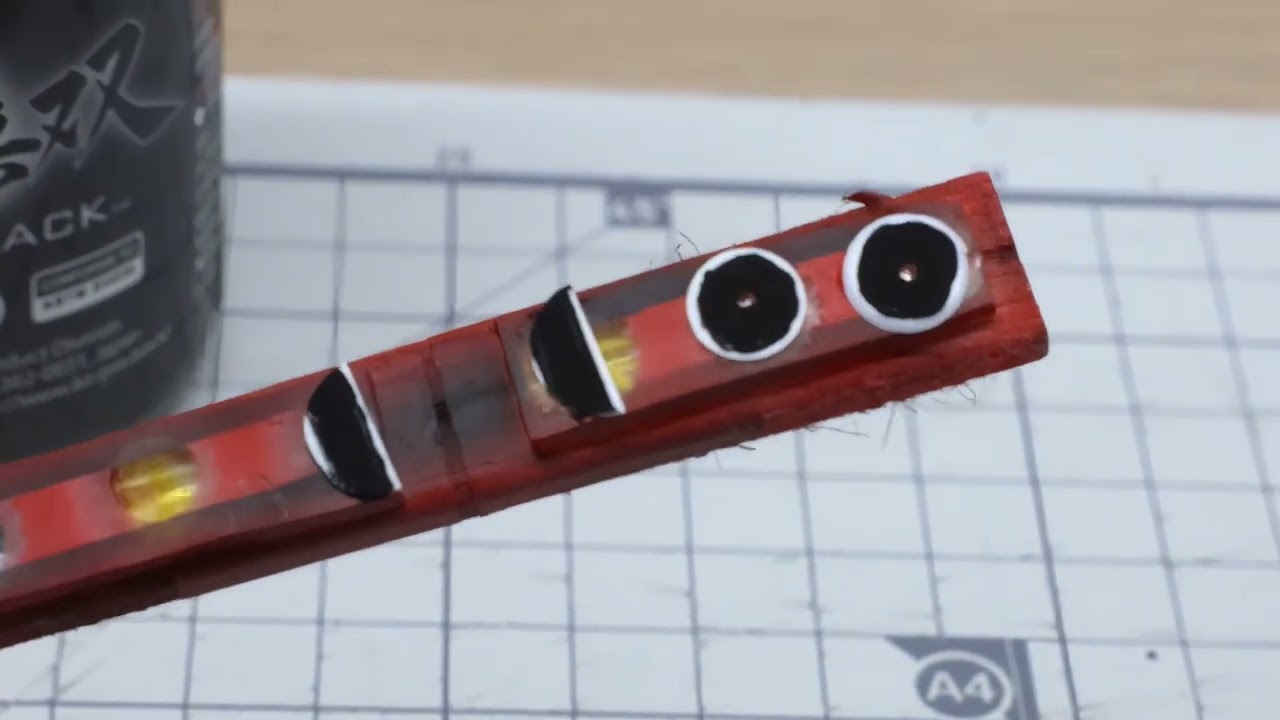
 104November 6, 2024The part that will be attached to the front fender has a little more detail.
 105November 6, 2024Last sanded
 106November 7, 2024Polishied. but, the paint steps where the number decal is located could not be completely removed.
 107November 7, 2024Painted with Tamiya Panel Line Accent.
 108November 7, 2024I also attached all the remaining decals.
 109November 8, 2024I also need to put a decal on the headlamp cover, but it doesn't fit perfectly.
 110November 8, 2024It's much easier to just mask and paint something like this.
 111November 8, 2024I cut a piece of nylon mesh and attached it to the air intake that had been removed.
 112November 8, 2024Painted with Vallejo Mecha Surfacer.
 113November 8, 2024Since this area is quite uneven, I decided to mask it and paint it with an airbrush because I was worried that it would bubble if I painted it with Vallejo paint.
 114November 8, 2024Ready to assemble.
 115November 9, 2024The engine was assembled first.
 116November 9, 2024I started assembling the cockpit according to the instructions.
 117November 9, 2024Assembled dashboard.
 118November 9, 2024The roll bar is molded into the side frame and it was bent so much at the top(I don't know if it was just the kit I had that was bent) that it wouldn't hold in place even with super glue, so I had to glue it to the rear bulkhead.
Next, I tried to install the dashboard as instructed in the manual, but I couldn't install it because the roll bar was blocking the indicated location. 119November 9, 2024I forcibly opened the roll bar at the indicated location and barely managed to fit it in.
 120November 9, 2024The upper roll bar also had to be forcibly bent and secured with instant adhesive.
 121November 9, 2024After cutting the nylon mesh nicely...
 122November 9, 2024Attached to the front grill.
 123November 9, 2024This kit doesn't have front wheel steering, but I decided to modify it because I thought the car would look cool if the front wheels turned. (I can't believe this is a 21st century kit)
First, I attached it firmly as instructed in the manual. 124November 9, 2024I drilled holes above and below the indicated location (they should be drilled vertically when viewed from the side/front).
 125November 9, 2024And I also drilled a hole in the front.
 126November 9, 2024I bent the head of the pin 90 degrees.
 127November 9, 2024Bend the wire appropriately and roll both ends into circles.
 128November 9, 2024And I put it in like this.
 129November 10, 2024I cut the wheel hub connection part with an etching saw.
 130November 10, 2024I cut out the part that interfered with the steering of the wheel hub.
 131November 10, 2024And then I'll reconnect it and cut the pin like this and insert it into the hole we drilled earlier.
 132November 10, 2024I also cut off a little bit of the inner side of the wheel because it was thick and interfered with steering.
The results are attached as a link in the comments. 133November 10, 2024I'll have to connect the muffler and exhaust pipe, but I'll just skip it.
 134November 10, 2024Engine room complete.
 135November 10, 2024All interior assembly is now complete.
 136November 10, 2024Other view.
 137November 10, 2024I attached chrome tape on the backside of the headlamp.
 138November 10, 2024A tiny metal ball was inserted into the location of the removed rivet.
 139November 10, 2024We did the same thing on the roof.
 140November 10, 2024The fuel filler cap is attached from the inside like this.
 141November 10, 2024It looks like this from the outside.
It looks different than it actually is, but it looks good, so let's just ignore it. 🙂 142November 10, 2024To attach some unknown device to the front fender, I attached a piece of pla-plate to the inside like this...
 143November 10, 2024Then I drilled a hole outside and inserted the made parts.
 144November 10, 2024Assembled headlamps.
I need to do a rivet expression, but I don't want to do it because it's too much trouble. I'm thinking of stamping silver dots later when I feel like it. 😛 145November 11, 2024I'm trying to combine the upper and bottom, but the rear under cowl and frame interfere with each other, so they don't fit together properly.
 146November 11, 2024I cut it out.
 147November 11, 2024I also sanded the marked parts to make them a little thinner.
 148November 11, 2024Attached windshield.
 149November 11, 2024The removed convex molds on the roof were reattached.
 150November 11, 2024I put a carbon decal on the underside of the wing. I should have cut out the support bracket connection groove and put it on, but I was too lazy so I just put it on and it ended up with wrinkles.
 151November 11, 2024Attached wing.
 152November 11, 2024Attached rear cowl.
 153November 11, 2024Attached canard.
 154November 11, 2024I made the side mirrors by cutting and pasting the stickers included in the Tamiya case. These stickers are thick and highly reflective, making them perfect for this purpose. However, because they are thick, it is a bit difficult to cut them into the desired shape.
 155November 11, 2024Now, finally, attach the side mirrors...
 156November 11, 2024All done.
 157November 11, 2024However, I was not satisfied with the quality of the wheels, so I ordered decaLcas products. So, I did not put any decals on the wheels because they are temporary.
 158November 11, 2024I really like the steerable front wheel.
However, I don't like how the edge between the blue and white in the front isn't cleanly masked.
I think it was because the narrow masking tape I had was old and had a lot of dust on it. So I threw all of that masking tape away.
 159November 11, 2024I realized too late that I hadn't made a tow hook, so I made one and attached it.
It's really over now. Thanks for watching~ 160November 24, 2024Decalcas' resin wheel arrived and I started working on it right away.
Since it's a 3D printed product, there are supporter marks on the inside.
And I was surprised that there were no traces of laminated layers.
Technology has advanced to this level. 161November 24, 2024Removed the supporter mark.
It seems that 3D printing resin grinds much better than regular resin. 162November 24, 2024Because it is resin, I used Vallejo Mecha Primer instead of a regular surfacer.
 163November 24, 2024I painted the wheels using the included masking sheet and painted the center lock with Tamiya Champagne Gold. The original plan was to paint the tires with Rubber Black, but I omitted it because the Mecha Primer alone gave off a rubber tire feel.
 164November 24, 2024The one on the left with the decal is a resin product, and the one on the right is the basic wheel and rubber tire.
 165November 24, 2024Now it's really, really, really over.
Thanks for watching~


Комментарии
28 April 2025, 06:42 -
Album info
FHD images - motorart.tistory.com/825

