

CF-101 Voodoo


Black box‘ cockpit is excellent.


„Prewashing“ with thinned Titan Metalizer for a bit more contrast after airbrushing (dull aluminum and steel).

After 3 rounds of Metalizer, polishing and washing with dark grey, metallic and brown.

All rised panel lines restored. For filling gaps I used usual no putty but CA and plastic (the better choice).

Each intake have TWO vane-plates.


Gaps in hinge-area filled with plastic.

Several antennas and probes. Long pitot tube scratched of an electronic test pin.

Fuel dump pipe replaced with brass tube. Notch for the two large fuel dump pipes replaced with plastic. Will be installed after painting.

Inlets opened.


Canadian 101 has on top only the red position light.

3 prominent holes on the left side drilled out. Plastic tube glued in for more deep.

The fuselage is almost ready for painting: only the windshield and the 6 locking hooks for the canopy are missing.

Gap between wings and fuselage covered with narrow stripe of 0,13 mm plastic.

The fit is average but for a moveable panel is OK (F-101 has a internal weapon bay & mounting which could rotate).

Off white completed. Surface sanded with flexible pad and raised panel lines highlighted (via sanding off the off white paint).


Black on the leading edge completed without mess. Masked for red (take 1).


Masking for red (take 2) removed.

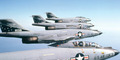
1st step: overall a mix of stainless steel and titanium.
2nd step: inner edges of the panels titanium.
3rd step: here and there burnt metal.
4th step: a glass of wine 🙂
2nd step: inner edges of the panels titanium.
3rd step: here and there burnt metal.
4th step: a glass of wine 🙂


IMO you need in quarterscale to paint the inner side of the canopy too. Else it would see like a toy...

Locking pins & lever and PE mirrors and as additional parts.


Read zu for painting


Unfortunately in the most cases the printed decal elements for low brightness yellowish formation lights are too bright and have black outline lines (wrong🙁). Because of that about 4 years ago I mixed a very light yellowish gray mix and coatet with them a piece of spare decal sheet. Now I’m very satisfied with the result.


Painting and wiring completed. Cover will be installed at next.


Nose landing gear in place without mess 🙂


Comments
8 October 2024, 07:54 -
Project info


Group Build
McDonnell F-101 Voodoo Groupbuild
1. May until 31. December 2022
1. May until 31. December 2022