

Grumman XTB3F-1S Guardian, 90506 (completed)


Commenti
2 3 April 2015, 12:17
As usual I begun a project with research and discovered that no models of the prototypes exist. This I why I decided to build the prototype in natural metal finish with red control surfaces. Obviously I have a knack for prototypes🙂
3 April 2015, 12:31
Which kit will you use? The new Special Hobby kit in 1:48 or the ACE kit in 1:72?
3 April 2015, 15:41
Hi Bill. Yesterday I receive the package with Be-12 and the brand new Guardian from Special Hobby in 1:48. I have seen that you don't have the ACE kit in your stash but the Ginter publication No20. Do you have intend to build a Guardian in the future?
3 April 2015, 18:01
I like the selection of aircraft you model Bernhard, Always something interesting and a little bit different.
3 April 2015, 19:03
Hi Bernhard - I would love to add a Guardian to my collection. I build in 1:72, and I haven't heard good things about the ACE kit, but the 1:48 kit from SH looks beautiful. Maybe they will scale it down just for me! 🙂
I would love to do a Hunter-Killer pair.
4 April 2015, 00:25
I'm tired after weeks of creating rib structure and drilling dozen of holes for struts and wiring (Stran) an so I opened yesterday the box of the Guardian... In this case I started with the cockpit. The layout of the consoles is very accurate but it lacks knobs, switches an other stuff.
22 April 2015, 20:37
THX🙂
Next results of my research: wheels&tires and engine.
25 April 2015, 11:32
Just discovered that the engine is too small🙁🙁🙁. It is only 22,5 mm in diameter but should have 25-25,5 mm...
26 April 2015, 09:53
Ouch - does that mean the cowling is too small in diameter as well? If it's just the engine there are several resin Double Wasp engines you could substitute, but it has to fit in the cowling.
26 April 2015, 11:46
I think The cowling is ok... I remember that the diameter of the original Double Wasp is about 1260mm or so... I combined the gearbox from the kit with the cylinderbanks from Tamiyas Corsair. Pics soon.
26 April 2015, 14:20
It was worth working exactly: the engine sits in the correct position with one offset of 3degree to the right side🙂
27 April 2015, 11:28
Now the cowling is complete and has all ribs (picture 26&27).
By the way: nobody should thing that I can do magic! I have to do things the usual way: see picture 28 - all 4 wheel halves are glued together but only the left have "drilled out spokes".
27 April 2015, 19:07
Thanks Mates.
Result of a mini task of today evening: paint for the engine.
28 April 2015, 20:34
pfff... very nice work on this one... how will you paint the interior of the cowling, or is everything still reachable with the airbrush?
29 April 2015, 14:15
Bart: I don't have a special airbrush which can spray around the corner🙂 When you posted your message this was completely painted already yesterday and it was no problem because I used matte paint that dried quickly in the "jet of air"??? of the airbrush (german: "Luftstrom"). See pictures 31&32.
29 April 2015, 19:21
thx for the answer, it could be that everything was still detachable.
30 April 2015, 08:02
The early bird catches the worm. The result of one hour painting before working at home today. This what I like the least (harness) is still missing.
30 April 2015, 12:45
Its unbelievable how many details you include in your builds...really great!
30 April 2015, 17:07
A most impressive build Bernhard, and the radial plumbing is most admirable mate. 🙂
30 April 2015, 22:47
Seldom I seen such a large propeller on single engined aircraft. 4,03 m in diameter, larger than the prop of the Skyraider and surpassed maybe by the Skyshark. Should have in 1:48 84 mm, have 86 mm (I think it is OK). The Double Wasp has to do very hard work....
1 May 2015, 08:53
It is not enough to separate the flaps and ailerons: you have to do a lot to get the wing's stability back. Pictures 42-45 show the result of the last modeling hours.
4 May 2015, 19:11
You're re-writing the Book of Modelling again, Bernhard! This is amazing stuff. Your attention to detail is unbelievable.
Regarding that big prop - the Skyshark was a contraprop, and the reference I consulted said it was 14 ft (4.26 m) diameter. So I guess it was a wee bit larger, but the Allison turboprop engine in the Skyshark had more than double the horsepower of the R3350 in the Skyraider. It needed two big props!
4 May 2015, 19:37
Now this is a whole new level of scratchbuilding. Lovely work so far mate!
4 May 2015, 19:43
Wow wow wow...i love your builds... you are not master of modelling...you play different sport....
5 May 2015, 14:43
Some new results of research: the shape of the inner flap is wrong but the fixed area of the wing on the fuselage is too small 🙁
Of course I noticed this AFTER completing one part and separating the other from the wing (grrrrr) 🙁🙁🙁 This means: swearing, sawing, glueing and sanding. It isn't half as bad as it sounds: Finally I found a picture where you can see the inside properly (picture 46). What I did is only half right (pictures 44 and 45). The fixed wing area is nearly so wide as the inner flap (compare with 46 and 47).
8 May 2015, 20:50
That cockpit is something else man !! especially for a 1:48 project !!
I absolutely insist you leave the canopy open when completing the model😉
Awesome !🙂
8 May 2015, 22:20
Now I'm content: the landing flaps are completed and the fixed wing area has the correct width. By the way: by accident I found a source for complicated shaped metal parts. Connection block (Messerkontaktleiste) for electronic equipment (see picture 54).
10 May 2015, 19:29
The finnets on the stabilizers were added later (productions machines). For all prototypes you have to fill the cutouts in the kit parts. Tesa film on the outside and plastic&CA glue on the inside is in my opinion the best way for this job.
14 May 2015, 06:08
The use of the Messerkontaktleiste metal bits is nothing short of genius Bernhard. It is amazing what we come across that we can adapt into our builds. Master. 🙂 🙂 🙂
14 May 2015, 08:38
Bernhard, I have the kit and have measured it. I find the nose to be 3 mm. short. I am considering a plug between the firewall and rest of the nose. It may be only 3 mm but it distracts me. Have you looked at built Guardians and compared them to the 1:1 model? Let me take this opportunity to say that you are creating a masterpiece, and I look forward to the final build.
16 May 2015, 16:15
I noticed that you joined today to our community: welcome to SCM DJ Tantrum! Thank you for your comments. But now I'm a little bit worried about your hint that the nose is too short. So far I have mainly worked on the wings. I just compared the fuselage with the drawing from the Naval fighters publication (unfortunately only basic) and with the cover picture. I did some quick maths and for me all looks good.
16 May 2015, 17:23
Today I masked the left aileron and left outer flap with Tamiya tape (second step) for creating the fabric structure. The first step creating of "sewing lines" was finished last week. In the last step I intend to create raised areas (tape on the fabric in the original) via airbrushing.
The lights on the tips are finished too. Pictures of the preserved machines show that the inside of the lights are metallic/grey. So I mixed CA-glue with metallic pigment from Gunze Mr Metall and produced color optimated CA-Glue. If I had painted this first and tried to glue it would not fit. Interestingly the prototypes had pitot probes mounted through the lights. I plan to use 0.7 mm needles for the probes.
16 May 2015, 17:47
Right from the very start, you have left no stone left unturned. !!
What a masterful display of every skill a modeller could possess. !
This build is nothing short of a real masterpiece in every way Bernhard.
Your attention to detail is inspirational.
Stunning. 🙂
Cheers
16 May 2015, 21:32
Not only the high quality of modelmaking but also the fast progress😉
17 May 2015, 09:49
Mates, very refreshing comments!!!!!!!!!
I was not really happy with the wheel bays. Unfortunately, the short run quality was hard to hide. I made up a few panels with rivet structure on the run but I'm not really satisfied with the results. Well I think the hydraulic cylinders for locking of the landing legs and their lines will save things🙂
17 May 2015, 20:16
The hinges made from "Messerkontaktleiste" fits. I stunned how durable the tiny metal parts are. I divided the etched parts from the kit and glued them on both sides on the hinges (2 of 4 so far). I'm very satisfied🙂
19 May 2015, 19:33
sehr interessant , zumal ich bei meinem Projekt, einiges Deiner genialen Arbeitswege "abkupfern" kann , sicher nicht in der Perfektion , aber der Baubericht ist sehr Hilfreich ,bei der Suche nach Lösungen für die eigenen Probleme oder Schwierigkeiten 👍 👍 👍 Danke für die tollen Bilder und Kommentare 🙂
20 May 2015, 04:25
Bernhard, es macht immer wieder einen Heidenspaß Deine Bauberichte zu verfolgen. Dummerweise lese ich diese immer auf der Arbeit, sodass ich dann meine aufkommende Modellbauwut nicht ausleben kann. Ausserdem wird es bei mir bald aussehen wie bei einem Messie, jetzt schmeiße ich auch alte Platinen nicht mehr weg! LOL😄
20 May 2015, 08:36
You need professional medical help urgently, this is not normal. Sincere congratulations and thanks for the extra work to show the step-by-step photos
20 May 2015, 08:53
Oberflächendetail abkleben und mit Farbe oder Surfacer aufbauen...gute Idee! 👍 🙂
20 May 2015, 15:21
Burkhard: ja, das klappt erstaunlich gut. Es ist wichtig, Semimatt zu benutzen, die richtige Dicke der Farbschicht zu treffen und die Masken recht schnell abzuziehen. Sonnst fransen die Kanten aus.
Today I had a very good day: no traffic jam on the A23 on friday!! Enough time for a coffee & rhubarbcake break with my family and a little modeling task. One stabilizer is half complete. Also in this case I used the "Messerkontakte" for the hinges. They match the typical make up of Grumman surprisingly well.
22 May 2015, 19:24
Impressive, indeed! It looks superb, I am really admiring your work!
22 May 2015, 20:13
Every gluing&sanding session has its end! Both stabilizers are complete.
25 May 2015, 14:56
The prototypes and early production machines had round rudder and higher fin. How do you find out, where to cut and where to add?
First I determined common reference points for photos of one of the prototypes and one of a late production machine shot from a similar angle: middle of prop-hub, trailing ende of the wing and aft edge of the rudder. Tomorrow I will print the sheet and now I know what to do.
25 May 2015, 19:35
Windows time! The fit of the three clear parts for the fuselage windows is not bad. But if you just glue it in, it looks bad no matter how precise you work. Because of this I glued them from outside with lots of CA glue. After dying I sanded them flush with 600 & 1000 sanding paper und 3200 & 6000 micro mesh. At last I polished the area with cotton cloth. All in all: a half hour work (a mini task for an evening).
27 May 2015, 19:52
In my opinion there are not too few pink colored airplanes🙂 I discovered that the best base for the red is a mix of light grey and red if one have materials with different colors.
30 May 2015, 07:04
Everything about this build says "Master Craftsman at work".
No detail left unattended.
Bloody amazing !!! 🙂
31 May 2015, 23:09
OMG... Ich super ja auch schon wo ich kann aber das ist der Hammer... OK... ich bin da meist in 1:72 unterwegs. Ich glaub ich muss mir auch mal ein 1:48´er Bausatz vornehmen. Aber an Deine Detailfülle komm ich im Leben nicht ran. Hut ab!
1 June 2015, 19:31
Unfortunately, the landing gear are a in the usual short run quality with a lot o flashes and out of register: the diameter varies from 2,6-3,1 mm.... So I decided to made all parts from scratch (pictures 81-83).
1 June 2015, 19:32
Bernard, making new ones to replace ones that don't "Fit" is the only logical thing to do mate. That's what makes scale modelling so much fun. !!!
'Scratch and attach' I call it. 🙂 🙂 🙂
Great to see the difference. !
1 June 2015, 20:28
I'm sure you'll get the right shape for this! Incredibly build! We all can learn a lot of your skills, to be honest!
3 June 2015, 19:41
Choppa: you are a sensitive observer. The Tamiya tape is for dust protection of the windows. I will remove them after completing the fuselage an this is the reason for threads. I'm going to pull the threads through the openings. By the way: so they don't get lost I glued the ends.
4 June 2015, 16:57
He's not just a pretty face folks.:-/
The thread to retrieve the tape from the windows inside is just pure logic at work, brilliant. 🙂
4 June 2015, 20:38
ah clever and neat !! and such a simple idea too, and there was I thinking it must be some mad cap way of painting the inside after assembly !! lol 😄
Anyhow, cheers for explaining, one to use for later 🙂
4 June 2015, 20:42
Tamiya CA is brilliant. It was necessary to create only the contours of the larger fin from thin plastic. I filled the hollows (about 1,5-2 mm) before dinner under plastic with CA and after dinner it was dry. Cockpit bulkhead: in my opinion it is very important to eliminate the gap between the bulkhead and the fuselage. The new engraved panel line plus rivets are well visible.
5 June 2015, 17:46
I am surprised I had to ask really !😉
anyhow, very nice, one feels like one could climb in there and start flicking switches in preparation for take off !! 😄
5 June 2015, 17:58
I would like to hear your opinion. I have only one color picture of a prototype in NM-finish (picture 94) and I can't make sense of the colors of the landing gear and doors. Partially (until the bend) in interior green ant the rest aluminum? Every comment is welcome.
6 June 2015, 11:02
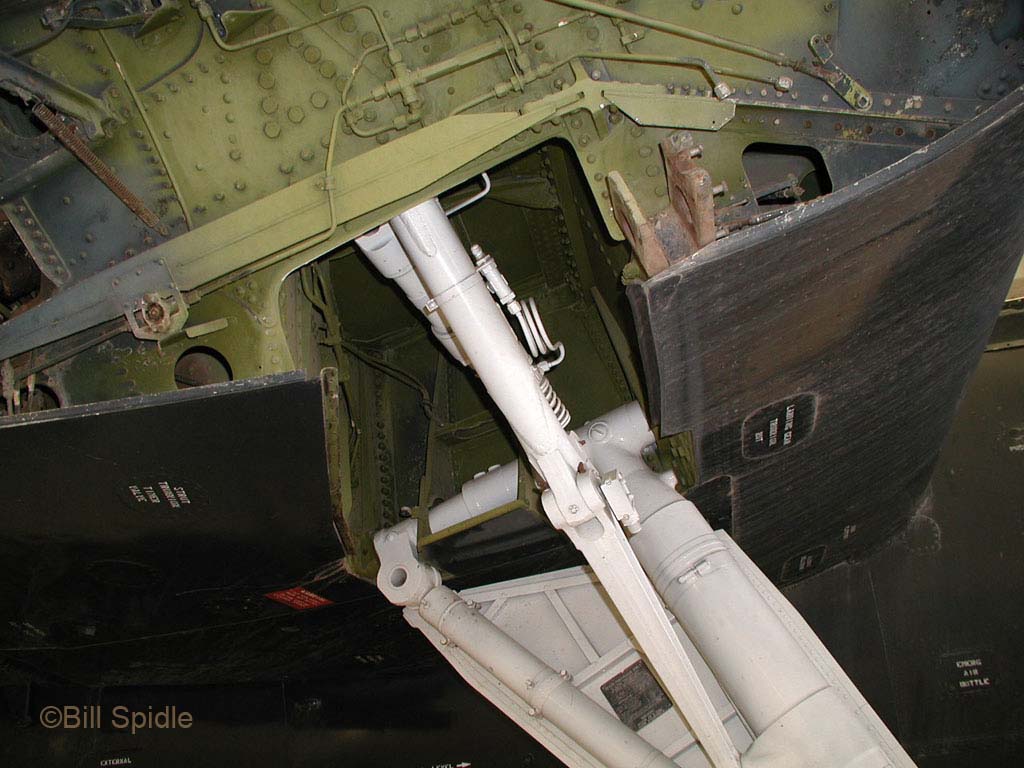
Hey Bernhard, it seems to me the landing gear is white instead of aluminum. The landing gear doors could be white and or interior green. I found this photo, not a prototype but that show what I mean:
[img1]
6 June 2015, 11:14
Hmm... bei den Navy-Fliegern mit einfarbiger Tarnung waren die Fahrwerke meist weiss... so konnten Lecks im Hydrauliksystem schneller erkannt werden... Keine Ahnung... vielleicht hilft es weiter...
6 June 2015, 11:15
Danke Jungs. Bei Serienmaschinen in Seablue wars sehr unterschiedlich: Seablue, interiorgreen, weiß und sogar Aluminium. Was meint ihr denn konkret zu diesem einen Foto des Prototypen in NM (pic94)?
6 June 2015, 11:33
Die Strebe ist weiss oder Alu... Ab dem Knie nach unten auch weiss oder Alu... Ich persönlich tendiere zu weiss. Darüber Int-green oder gelb... (die hatten doch bei den Corsairs auch so ein schmutziges gelb) vermutlich aber Int-green. Wirkt nur gelb, weil da die Sonne voll draufknallt.
6 June 2015, 11:46
To bring you back to the topic😉 The discussion was about the color of the landing gear and landing gear doors. I believe the landing gear is white and the doors interior green or probably white. Ralf Schuster agree but was not sure completely. Bernhard asked again about our meaning of the colors shown in photo no. 94.
@Bernhard, I assume landing gear and doors are white in photo no. 94! Wheel wells interior green as in the photo I have shown.
6 June 2015, 15:30
Sorry.
Ralf (1) meant, with Navy birds in one color scheme the landing gear was white for better hydraulic leak indication. No idea concerning my question.
I meant: thanks guys. With sea blue airplanes the landing gear was painted very differently: sea blue, interior green, white and even alumnium. What do you think about specifically the plane in NM (picture94)?
Ralf (2) meant: the strut is white or aluminum. Below the bend white or aluminum. In my opinion white. Above the bend int-green or yellow (similar to the dirty-yellow with the Corsairs), probably is int green. It seems yellow because of sunshine.
So, now we are on course again🙂
6 June 2015, 15:38
cool, interesting considerations, my instinct says white for Naval aircraft but I aint sure but looking at other Naval planes it does seem a common line of thinking
6 June 2015, 15:48
I believe it is all white Bernhard. The color looks darker because of shadow.
6 June 2015, 16:00
Hi Bernhard, i am not expert, but from my perspective it looks like white...
not sure, how relevant is this page, but it seems that foto is with white landing gear: jitterbuzz.com/MAN_1948_06.html
6 June 2015, 16:37
The Grumman Guardian first flew in 1945, I think. Does this natural metal prototype date to that same time period, late 40s? If so, I would think the landing gear and wheel wells were aluminum or zinc chromate green. White seems to be coupled with the gull gray/white scheme from the mid-50s onward.
Bernhard, did you ask Tommy?
6 June 2015, 19:55
I was stunned about how many Mates respond to my question. I was also surprised by how many different opinions there were🙂. Thank you very much.
I think I have now an opinion. Upper part of the leg, upper part of the door and diagonal outer strut: zinc chromate/interior green. Lower part of the strut and lower part of the door: white. There is indeed a contrast between the wheel (aluminum) and lower part of the strut (white).
6 June 2015, 20:31
Just don't go counting the rivets mate. 🙂 I am wondering if all the 'facts' would be in the manufacturers archives. ? That is if it still exists, because usually, it can be found in Google somewhere, or at least, a wikki link somewhere. just a thought. 🙂
6 June 2015, 20:43
Kerry, it is stunning where pictures could be found... Thank you.
And again a mini task is done: landing gear in the most unusual colors that I've seen.
9 June 2015, 19:31
Somebody stop him. !! :-O
Everything you are touching is turning to gold Bernard.
Your skills in all aspects of this build should be published in a modelling magazine, along with every step taken here.
Wonderful. 🙂 👍 👍 👍
9 June 2015, 20:34
Fantastic detail on the landing gear, amd everywhere else Bernhard! Looks great!
9 June 2015, 21:39
You are good eyes Kerry: it is indeed bare metal foil.
Today I spent about two hours in "gluing" of the windscreen. Carefully aplying of CA-glue and thin plastic stripes for filling any gaps (one hour). The other hour I spent in sanding, restoring of an gratings and riveting. I'm 100% happy with the result despite the not symmetrically windscreen (on the left side the part is higher and "warped"😢.
11 June 2015, 14:54
Missed this one!
Very interesting project, unusual plane. I like what you did to cockpit, but I'd add a little wash..😉
11 June 2015, 16:22
Wow, you use CA on clear parts ? How do you avoid the fogging by the glue's vapour ?
11 June 2015, 19:20
Hi Hanno. The fog only comes up if you use a lot of glue AT ONCE. I had only very small gaps between fuselage and windscreen so only a little CA glue necessary. Despite of that I used thin plastics stripes (0,13 mm, pics 100 and 101) to fill the gaps. Then I used only very small drops of CA at once which needs only few seconds to dry. Fertig🙂.
11 June 2015, 19:33
Hanno, there are some tricks to using SG that will prevent the "Fogging" or(oxidising) and I do this.
I will use a pin or a needle to apply the amount I need, AFTER I have put a drop or two onto a "Pallet" and let it sit for a few minutes.
It wont lose any of it's gripping power by letting it 'rest', but it wont be as 'aggressive' when applied and the chemical reaction between the two surfaces is not as intense, so the 'fogging' is prevented.
And it is also really great for using as a 'filler' in this state, and can be sanded if need be too.
Cheers. 🙂
11 June 2015, 19:35
Bernhard, This really is an inspiring bit of great work mate, but now I will ask.
Where the exhaust stacks are going to appear from the rear of the main cowling, are there parts that look like the exhaust pipes that will fit into these spots. ?
This aircraft looks like a "Skyraider" in so many ways.
Are they "Related". ?
11 June 2015, 19:39
Thanks for these useful explanations, Bernhard and Kerry. Up to now I didn`t dare to use CA in this manner,
but your both ways of dealing with this subject really makes sense to me,so next time I´ll be able to benefit
from the advantages of using CA, as its ability of being sanded very well makes things a lot easier sometimes . 🙂
12 June 2015, 05:56
Hanno, the "Gel"superglue is really good too and stays where you put it.
12 June 2015, 06:30
CA-glue: my absolute favorite is the thinn CA from Tamiya (look pic 106).
12 June 2015, 06:56
Kerry: I still owe you an answer concerning the exhaust stacks. I think your question will be answered in picture 109.
By the way: the kit is starting to get on my nerves. Nothing fits: the long edges of the radome-part are about 1 mm too short on the front (picture 107). The lower cooling flaps are practically non-existent 🙁 (look picture 108 and compare with 109).
12 June 2015, 18:10
Bernhard, thanks for your catching up with my question, and as for the cooling flaps/louvers, could some thing brass sheeting come into play. ? And too short on the radome. ? So, plastic sheet for the gap ?
With what you have done with all the other detailed pieces, I do believe you will overcome what ever obstacles are presenting at this stage and do a wonderful job on them all.
I know how draining things can get, and how frustrating it becomes, and then there is, the whole world looking over your shoulder. :-/ .
You have what it takes to present an other stunning result mate.
Go have a coffee, and sit in the sun for a while, and then see what happens. ...maybe. !!
12 June 2015, 20:48
Now the Double Cyclone can breathe properly: the cooling channel's and flaps are in place. The prototypes have an another configuration of the exhaust pipes: through the (flat) panels. So it was necessary to make openings in both panels. The best way to produce of two mirror-symmetrically openings was a scribing-template from thin plastic.
13 June 2015, 17:23
Ah ha, problem solved, and I had all kinds of dumb suggestions ready too. :-/ 👍.
I am obviously, suitably impressed with your abilities and skills.
I can't wait for the next miracle Bernhard, bring it on. ! 🙂
13 June 2015, 21:49
Kerry, Michael and Soeren: thanks for motivating words🙂
Fuselage alias the never ending story... After enlarging of the height on the front I glued the radome to the fuselage. In this case too I used the old trick with auxiliary holes for applying CA glue from outside. The auxiliary holes are well visible:
118, white quadratic plastic piece, in the middle of the picture
119, light grey/dark grey spot on the left side.
The plan worked: I did not have to sand on the long edges. The filling of the holes.needed only few minutes.
The next step: the bulges on lower side of the fuselage (see picture 1). I think I will made than from ureol.
By the way: does anyone know what the bulges were for?
15 June 2015, 15:08
azcaf.org/pages/airc../AF-2S_Guardian.html
this says: The finlets were to provide lateral stability, which was affected by the radome. I think they mean these. Otherwise I can only take my hat off to the level of detail you are showing here...
15 June 2015, 15:23
This really is a great project to follow Bernhard, as there is always something fascinating to catch up on, and it keeps me motivated with my project as well.
A most entertaining builder mate. 🙂 👍
15 June 2015, 15:55
Hi Bart. Thx for support but I mean not the finest but he bulges (see picture 120).
15 June 2015, 15:56
Anyone who can land me a BIG hammer so I can trash the model and the remaining parts!!!!!! 🙁🙁🙁Today I finished the fuselage (glued and cleaned the elevators) and I noticed that there is a big mistake: both elevator are not in line (compare with drawings) and they would not work on the original (common axis).
17 June 2015, 17:34
.
Steps required Bernhard, step (1) very important....
1) Put hammer down,
2) Razor saw off at the roots,
3) Chamfer roots to correct angle,
4) Re-attach
5) Continue this awesome build 🙂
17 June 2015, 18:00
Thanks Choppa!!!!
No worries: the hammer is in the safe. Unfortunately it is too late for correction because the moveable parts are painted already in red. Moreover I'm fed up. Special Hobby probably has designed the elevators so that not the forward edge (axis) but the trailing edge is in line. Sh....t happens: 2x2=4,5
17 June 2015, 18:16
surely the paint can be undone easily, and chamfering the roots is well within reach for you as are any other minor adjustments. Don't let your frustration get the better of you. You've invested too much to quit now 🙂
Take a break from it for a while and let the solution ferment a while.
Perhaps start planning your next build just to take your mind away from the sore point 🙂
17 June 2015, 18:30
Do what I do.....build something else to get a clearer picture, and it works for me. !!!
17 June 2015, 21:14
@Kerry: sometimes I try that too, but now I have a lot of unfinished builds 😉
@Bernhard: good luck, and I'm confident that you will succeed with the necessary changes... As said before, you've done to much changes to throw in the towel (or hammer)
18 June 2015, 07:43
You were right: one day later I don't remember how to spell hammer🙂 on closer look it turn out that the angle on the right side was bigger. So I corrected only the right side. It's still of angle not as bad as before.
Last night and today morning I could do what I like best: airbrushing. It was fester than I thought: the fuselage is ready minus interior green on the inner sides of the moveable surfaces and tail wheel well.
20 June 2015, 11:09
Bernhard, by the looks, all this amazing work you have been doing is coming to an end, and I am just not moving from my chair until I see some more results, and the alloy shell looks great.
More please. !!! 🙂 👍.
20 June 2015, 12:21
Amazing how you routinely come up with immaculate results, despite all the major surgery. 👍👍👍
22 June 2015, 17:43
And again... What a superb built ! Bernhard, You are the true master of aircraft modelling ! Did You ever thougt of building some AFV 's ?
22 June 2015, 18:28
This is the high art of modelling compared to what most of us mere mortals do with our assembling...
22 June 2015, 18:30
Surgery fits: today I had to get some dental surgery done-🙁 but all is well now. I can't eat so I am feasting on your comments instead. Thank you so much🙂
Tomorrow to the workbench again.
Christian: in the last 20 years I built about a half dozen of AfV's. Maybe you know two of them: Challenger II in 1:72 and Tamiyas Komatsu in 1:48 (both present on MV).
modellversium.de/gal..atsu-g40-tamiya.html
22 June 2015, 19:52
Thank you Michael: 24 hours later I had the first real meal: mashed carrots and potatoes and it was just wonderful!🙂
I noticed that some of you are interested to know more of my NM-technique. Because of thet I would like to explain my way. As usual I use an own mix of approx 1/3 Testors Metalizer, 1/3 Testors Sealer and 1/3 Mr Metal (Alminute) from Gunze Sangyo. On the the picture 134 you see the first step: surfaces are airbrushed with the mixture which produces a relatively matte and homogeneous finish. Next steps (sanding and polishing with different micro meshes and cotton swabs) to get the surfaces "vibrant" coming soon.
23 June 2015, 11:54
Yesterday I started a more one research which color the panels on the leading edge of the wings had. I realized that very likely they must have been red. Then I realized further that the plane in this color scheme has no the moveable panels (air brakes?) on the trailing edge of the wings. They were obviously added shortly before the airplane moved to the NATC Patuxent River and the red areas where repainted blue (picture 141). I did not like to change them. Maybe the air brakes were added before repainting....
25 June 2015, 19:08
Well Bernhard.... Did You ever had in mind to show this one to the people of " Special Hobby" ? It would be a nice item for there next catalouge. What a clean and nice built ! Excellent !
25 June 2015, 19:20
Finally I can do what I have been waiting for for several months: mounting of the wings to the fuselage. In the first step I managed the correct alignment in both "directions" with thin stripes of plastic so the wings have a snug fit nearly without gaps. Well visible are "indentations" for storage of the CA glue. In these indentations I will apply CA glue, and after insertion of the wing the contact spots will use the capillary effect to get the CA glue they need. It worked in the past and I think it is going to work now. Wish me luck🙂
27 June 2015, 08:08
At fife to twelve I noticed (fortunately!!!!) that the dihedral of the right wing was practically not present... This meant that I had to remove about 0,7 mm on the upper side of the edge on the completed wing. Not funny🙁
27 June 2015, 12:55
Du suchst dir aber auch immer "Schräge Vögel" aus Bernhard!
Eigentlich braucht man sich darüber keine Gedanken zu machen, denn wenn du die Modelle fertig hast, wird immer ein Augenschmaus daraus.
27 June 2015, 13:05
thx. Surprisingly it was a very minor collateral damage. I only had to repaint a few spots. I was lucky that the guardian has a black walkway on nearly the entire wing depth. So I cover up the glue blunders in black🙂-🙂-🙂
27 June 2015, 15:26
You certainly are a most skilled and talented modeller Bernhard. 👍 👍 👍
It has be a total delight to watch your creation develop into what you present now. 🙂
A huge congrats mate. 🙂
Cheers.
27 June 2015, 19:38
Anti skid walkways. In the most cases they will be made from decals or painted black or dark grey. I think this will be interesting for you. This is another way to create them. Transparent decal film, brushed over with a very thick coat of unthinned paint with very low pressure. This produces a rough gritty surface. After a few minutes when the paint has started to dry, apply sanding cloth (Micro mesh grid 1500) to enhance the effect.
28 June 2015, 08:13
My deep respect for your skills, Bernhard! Outstanding work, again!
28 June 2015, 08:48
I've heard that people use PE parts for this, but personally I just paint the on model. But yours look great!
28 June 2015, 10:14
Thank you Mates. By the way my working techniques has 2 sides. First nothing really visible happens in several weeks and then everything falls into place🙂 In less than one hour I assembled the main landing gear. It fits, holds together without glue (wire pins for alignment). Pictures coming soon (after gluing, first a bicycle tour with my family and cake & coffee time).
28 June 2015, 12:10
.
Well it is Sunday afternoon after all, tea and cake sounds absolutely spiffing, what what !! 😄
looking awesome btw ! 🙂
28 June 2015, 12:28
I thought that all problems are solved. This is unfortunately not correct🙁
This morning I have noticed that the moveable part of the canopy is designed only for the closed version. The open version is not possible🙁
29 June 2015, 09:58
Hi Kerry, thanks for comapassion🙂. I just solved the problem via gluing of 0,8 mm squeere rods. Wasn't too bed🙂 (pic 155)
29 June 2015, 10:47
I see that your progressing well, and the remedy is going to work and I really didn't expect anything else mate, because, your good. !! 🙂 👍 👍.
29 June 2015, 12:28
Nothing short of fantastic in every way.
Congratulations Bernhard on a spectacular build. 👍 👍 👍 🙂
29 June 2015, 22:41
That is really an eye-catching model you have there, Bernhard. It has been fun following along on your build.
30 June 2015, 05:54
just stunning.... thx for the lesson in painting the metal surfaces....
30 June 2015, 07:38
Great journey with a fantastic result! A pleasure to follow such a work 🙂
30 June 2015, 12:23
Wird schwer werden das zu toppen, mir gehen die passenden Worte aus!
30 June 2015, 13:52
Fantastic build Bernhard! An all-around excellent finish, and a very informative and detailed build-log!
30 June 2015, 14:37
During the last 11 weeks while I built this plane, I turned fifty, did some modeling in carton and wood with my son🙂 🙂 and had dental surgery🙁 Also as a side effect, my English got better a little🙂 This was a very fulfilled time made richer by all your supportive comments while the Guardian took shape. Thank you. P.S. The next project is starting to materialize in my head but: today it's time for a glass of wine. Cheers.
30 June 2015, 19:17
Bernhard, it looks like you need to do some thinking before your next project,,,,,no telling what changes might come about because of it.
30 June 2015, 19:25
Congratulations on your half century Bernhard, and how wonderful to have everything going so well for you.
We old farts have a lot to pass on to the Kinder, so pay attention to your elders you youngn's. LOL
I and all of us out here thank you for all you have passed on.😉
You truly are the master. Salute> 😉
Cheers mate. 🙂 👍
30 June 2015, 19:34
Danke Dieter. Hab gedacht, dass es wehtut aber habs gar nicht gemerkt (der Zahnarzt war schlimmer🙂. Hab an einem sonnigen Sonntag gebruncht mit 45 Leuten, die mich teilweise seit mehr als 30 Jahren im Leben begleiten...
30 June 2015, 20:00
Kerry: by the way. In 2005 I spent three most impressive weeks in your beautiful country with my wife. We landed in Sydney (nearly met Brett Green) and traveled to Cairns. The journey was much too short: we took more than 1000 pictures. These are the ones we like best: we see them every day (see the last three pictures please🙂
30 June 2015, 20:09
I am so pleased you have seen my homeland, and we really are so far away from the rest of the world. 🙂
Nearly all of our population lives within 200Km of the ocean, as we have settled the coast line rather than go inland, and I have been around Australia on my BMW R1150R three times now, and each time, I see something different.:-o
So, when are you coming back to live here.? 🙂
Now that your English has improved, you wont find it so hard to understand the way we talk. LOL 🙂
Did you walk over the Sydney Harbour Bridge ?
30 June 2015, 20:41
Absolutely brilliant build and just as good as espected. You know mate, you do raise the bar for each build and before you know it we'd expect yo to scratchbuild a working model of the Deathstar in scale 1:48...
30 June 2015, 21:06
I´m in with the Deathstar, but 1:72 will do. We want not overcharge Bernhard.
1 July 2015, 17:49
Do you guys know how small my garden is respective how big the Deathstar in 1:72 is????
1 July 2015, 19:39
Well, we don't know the size of your garden but we do know that the Deathstar is a tad bigger than your yard in most scales. But then again, that wouln't be any problem for you mate...
1 July 2015, 20:34
I dont know what superlatives I should use, none seem to describe this one correct. Your projects and skills are a true inspiration to us all Bernhard. 👍
5 July 2015, 10:52
Thank you for this second "wave" of nice comments for the Guardian. I'm glad my ideas help🙂
7 July 2015, 15:47
Album info
Photos of completed model: 156-175

